Wednesday, October 21, 2009

New Blog!

Hi to all of the blog stalkers who follow this blog! :)

It is really hard to keep up with two babies
and two blogs, so I'll be combining our family blog and my craft blog into one! I know this blog has been neglected because I just don't have time to keep up with both of them, but hopefully now I'll be more motivated to post more tutorials and craft ideas on the new blog.


You can now visit us at
www.ourhappylittlenest.blogspot.com.

Hope we'll see you soon at the new website!
Mary Catherine

Thursday, October 1, 2009

Monogramming

Woo Hoo! Look who finally learned how to monogram!

My mom and I spent 4 hours with her sewing machine last Friday afternoon because I really wanted to add a monogram to this pillowcase dress I had made my friend before giving it to her at her shower on Sunday. Now that we've figured it out, I've already started making a list of all of the outfits I want to sew for my girls.

I made a quick run into Hancock Fabrics this morning and their embroidery thread was 50% off. I stocked up on every color I think we will possibly need and plan on having a monogramming party this weekend while my husband is off hunting. I hope to have some cute things to share this weekend!

Wednesday, September 30, 2009

New Doll

I've been dying to share this little doll the past several weeks, but she was a gift for a sweet friend who is expecting her first daughter so I had to keep her to myself until after the baby shower! The theme for her nursery is inspired by the cutest matryoshka doll fabric so I made her this doll to go in the nursery. I hope it will be something she will love to play with!

Tuesday, September 1, 2009

Just My Luck!

We've been in our house for almost 18 months and I'm finally ready to start decorating our living room. It needs a little freshening up. The two words that come to mind when I think about this room in our house are BLA and RECTANGLE. When we moved in, I just found a place for our furniture and have put little effort into making it a cozy and comfortable room for our family to spend time in.

My major hang up has been our sofa. It was the first piece of furniture my husband and I bought together for our first home and I anxiously waited for weeks for it to be delivered. When the delivery men brought it into the house, I was SO DISAPPOINTED. The fabric that I choose when ordering the sofa looked white in the store, but the couch that was sitting in my den looked more like a yellowish buttercream! BLEH!

For 4 years I have tried to decorate around this sofa, but let me tell you...NOTHING goes with yellow buttercream.

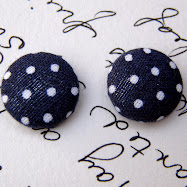
I forgot to take a "before" picture of the couch. Just to give you an idea, imagine an entire couch the color of this pillow. See what I mean? It isn't a white or a khaki or a cream. The nicest thing I can call it is yellow buttercream.

So for several months now, I've been collecting pictures of rooms that I love online for decorating inspiration. Here are just a few examples...


Do you see a theme developing here?
As I flipped through them one night I realized they all had one thing in common...
A White Sofa!

I didn't even realize I was picking out all pictures with white sofas until looking at them all at one time. I guess I'm just drawn to that look.
************************************************************
However, I couldn't justify buying a new sofa when ours is in perfect condition.

Next thought, "I'll have it slipcovered." After getting several quotes I realized that having it slip covered would be just as expensive as buying a new one.

Then I had the grand idea of sewing my own slipcover. Ha! I tried practicing on a chair first and quickly became discouraged. (Have I mentioned before that I like my projects to be quick and not too involved...following a pattern is not my idea of fun).

Then one night when I was about to drift off to sleep, I had a crazy idea. I was too excited to relax so I had to jump out of bed to go measure my couch. I remembered seeing a couch on the Ikea website that looked almost identical to my Broyhill sofa. Could I dare to hope that the two sofas were close enough in size that the Ikea slipcover would fit on my couch?????

The dimensions were almost identical, give or take an inch or two here and there. Do you know how much Ikea's white slipcover cost? Drumroll please....

$49.99!!!!!

I ordered Ikea's slipcover and hoped for the best. As soon as UPS delivered it, I tore into the package and immediately started trying the slipcover on piece by piece, holding my breath as each cushion fit perfectly into the slipcover. I didn't let myself get too excited until I put the slipcover over the actual sofa part and wouldn't you know? IT FIT!!!! The girls just watched me in awe as I squealed and danced around the room. Our yellow couch is gone and in its place is a beautiful white sofa!! And even better, it is slipcovered so when it gets dirty (and it will with babies and toddlers climbing on it all day long) I just have to throw it in the wash and it will be clean again.

Oh happy day!!

This is the only picture I have of it right now.
Sorry! After all of that build up, this is all I have to show for it! :)

I'm picking out fabric for pillows and window treatments and will hopefully have the room ready for pictures soon enough.

I just wanted to post this idea so that if there are other people with the same predicament that I was in, they can consider this as an option. The slipcover was for Ikea's Ektorp sofa, which is a very basic and common design that many people have. This idea could also possibly work for recovering chairs if they were close enough in size.

Thursday, August 27, 2009

Nursery Room Favorites

Caroline is already 12 weeks old and I have yet to finish up the nursery! We've been piecing it together bit by bit since June and here are some of my favorite things from this little room of the house:

I LOVE this fabric (Gypsy Spring) and found some online to make the dust ruffle and had enough left over scraps to recover the shade on the floor lamp.


For artwork over the crib, I replaced the sailboats with a set of flowers that I also created using leftover scrap-booking paper I had from previous projects. All four prints together say "Mary Mary quite contrary how does your garden grow?" and I love the way they coordinate perfectly with her butterfly mobile.


Her room wouldn't be complete without a Rosie Posie doll, and I snagged this pillow from Anna Cate's room (which is STILL a work in progress) for now to use in the crib.


This print from Sarah Jane Studios is another one of my favorite things in her nursery. I found the frame from Goodwill for 50 cents and gave it a facelift with some white Krylon paint. I love the little detailing on the frame - it is subtle, but adds just a little character to picture.


This little shelf hangs over the dresser we also use as a changing table. I'm looking for a white mirror to hang over the dresser, but for now, this is how we have the little shelf decorated until I can find just the right mirror to replace it.


And last, but certainly not least, this is probably my most favorite thing about her nursery...the little ballerina who can't seem to leave her little sister alone long enough for her to even take a nap! Caroline's crib is the first place Anna Cate runs in the morning to get her sister up and she constantly is asking to get her while Caroline is napping. So sweet!


Friday, August 21, 2009

Visionary

Anybody who can take this:


And this:

To make this:
Has my utmost admiration!!


I have become obsessed lately with all things related to home decor. We have been in our house for over a year and a half and I have yet to decorate it. While looking for ideas and inspiration, I stumbled across this blog, Life in the Fun Lane and am in awe of the vision this girl has! I'm all about shopping at Goodwill and thrift stores, but I have to admit that I most likely would have walked right past these two pieces without a second thought.

Another great blog full of ideas and inspiration for decorating on a budget is The Nesting Place. If you are in need of any ideas for your home, you should definitely check these girls out!


Wednesday, July 15, 2009

Frugal Headboard Take 2

I had planned to post a picture and tutorial of a cute apron, but my camera battery died and I have no time to charge it and get a picture of the apron before my two little ones wake up from their nap, so instead I'll share a quick project I did this past weekend.  

Anna Cate destroyed the first headboard I made for her room several weeks ago during her nap time.  You know, the one I made from foam board?  I had to strip her room of all of toys because she plays with them when she is supposed to be napping.  Because she couldn't find a toy or book to play with, this particular afternoon she decided to see what else she could occupy her time with and decided on her headboard. When I went to get her up from her nap, it was bent over in half.  So much for that idea.

This past Friday afternoon I found this headboard at His House for $10.  I brought it home and with just a little sandpaper and two cans of white satin spray paint,  she now has a new headboard.  I actually like this one 100 times better and it was a fraction of the cost!  Now I'm on a hunt for a bedside table... 

Lesson learned:  Never make an upholstered headboard for a toddler's bedroom! 

Before:


After:


Thursday, July 9, 2009

Butterfly Mobile

Ok so I realize that this has totally become a baby blog and for that I apologize!  I just have very few moments for projects these days and so the things I choose to make usually revolve around one of the girls!  

In an attempt to make Caroline's room more girly, I've hung this mobile over her crib and must admit that these butterflies are some of my most favorite things I've made.  I originally made them two years ago for a mobile in Anna Cate's room and was excited to get to pull them out again when we found out that Caroline was a girl!

The project was very easy and super inexpensive: 
  
Embroidery Hoop - $0.75 
White Grosgrain Ribbon (3 yards) - $ 3.75
Clear Fishing String - spool for $1.50 
Pink Beads - $2.50
Jewerly Wire - $1.50
Heat n Bond - $2.00
Fabric samples - Free! 
I collected them from various fabric stores.  Most fabric stores will have pre-cut samples pinned to the large bolts of fabric for customer's to take.  If you do this, just be sure to grab 4 of each sample because you'll need two pieces of fabric to make one wing of the butterfly. 

Total Cost of Project: $12
(Much cheaper than the ridiculously expensive ones you see from Pottery Barn or Land of Nod and even cuter & personalized if I do say so myself!)

Directions:
Step 1:  Start by using the jewelry wire and beads to make the body of the butterfly.  You'll want to cut the length of the wire 4 times longer than you want the length of the body (party that looks like a worm) to be.  After you finish stringing the beads, fold the wire in half and then twist to form the butterfly's body.  

Step 2:  Draw a template of the wings on a piece of paper and cut out.  Use this as a reference to know how big to make your fabric squares.  Using your Heat N Bond, fuse together two pieces of matching fabric.  Trace your wing template onto fabric and then cut out a wing.  Repeat this step 3 more times to get a total of 4 wings for each butterfly. 

Step 3:  Hot glue the top wing to the bottom wing so that they form one piece with the top wing overlapping the bottom wing. 

Step 4:  Using a needle and thread, stitch the half of the butterfly (top and bottom wing glued together) to the beaded body.  Repeat for other side.  You should now have a complete butterfly.   

Step 5:  Cut two small pieces of thin ribbon about 2 inches each.  Hot glue each end of the ribbon to the back of each side of the butterfly.  This creates a "loop" for you to thread the fishing string through.  

Step 6:  String up each butterfly and attach it to your mobile base.  Then use a white cup holder hook to screw into the ceiling to hang the mobile from.   

Hint:  There are several items you can use as the base for your mobile.  I originally tried glueing two wooden dowels together in the shape of an "X," but this wasn't the best method to use if you want the mobile to hang level.  You can use an embroidery hoop like I did for my fish mobile if you want a round shape.  For Caroline's room, I used the base that my mom found that had been my mobile when I was a baby.  You could easily create a base like this by using some tinker toys if you had access to a set.  

Thursday, May 14, 2009

Indecisive!

Several weeks ago I decided that I didn't like the polka dotted bumper that I made for the nursery - for boy OR girl!  I know, I know...this pregnancy has made me so indecisive!  But it just wasn't my style and I couldn't come up with any artwork or accessories to coordinate with the polka dots. 

My wheels started turning on what to do.  I definitely had to use what I already had on hand to come up with something because I wasn't going to spend any money not knowing what we are having.  

For a boy, I started with this PBK Sailboat bumper I had stored away in the linen closet from a bid I accidently won (don't ask!) on Ebay for $5 when I was pregnant with AC. 

 I saw some sailboat artwork on another friend's blog and used it as inspiration to create some artwork with scrapbook paper to hang over the crib.

I used some fabric scraps to make a sailboat pillow for the rocking chair that coordinates with the sailboat artwork on the wall. 

Then I used some more fabric scraps, ribbon,  and a large embroidery hoop to make this little fish mobile to hang in the corner of the room.  The mobile is hanging directly over the ac vent, which makes the little fish slowly spin every time the air is on.  They are so whimsical and colorful and I love how they turned out! 
 
I also picked up this little wooden sailboat at Michael's for $1.99.  I painted it and put it on the little shelf above the changing table.
 
I haven't taken any pictures yet of the things I've done if we have a girl.  Maybe I'll have time tomorrow and can post those soon.  They are equally as cute and I'm really getting anxious to see what we are having!

Thursday, April 16, 2009

DIY Wedding Gift Ideas

Monogrammed Candle
My sweet friend, Hannah,  made this monogrammed candle for me for Christmas this year and I love it!!  I thought it would make a great gift for a wedding or shower gift for a new bride-to- be.  

She said it was very easy to make.  She just found a font in Word that she liked and printed out the letters in the monogram.  She then used a pencil to trace over the letters onto the candle to make an outline of the letters in the wax.  Finally, she used a paint pen to color in the letters of the monogram! 


Monogrammed Plates
Photo from 320 Sycamore

And I love this idea from another blog I stumbled across this week.  You can't actually eat off of the plates, but they would look great hanging in a kitchen.  

Melissa takes you through an easy step-by-step tutorial of turning any plate into a beautiful monogrammed gift for someone special! 

Wednesday, April 15, 2009


My sister called last night and asked me to make something for a friend of hers who is having a baby shower on Thursday.  She is a big Clemson fan and is having a little girl this April.  This is what I came up with and OH MY GOSH HOW CUTE!! All this cute girly baby stuff I've been sewing lately is really making me wish this next baby is a girl too! 

I didn't take pictures while I was making this one, but I have a request for a few more and will be sure to take pictures so I can make a quick tutorial to share soon! 

Tuesday, March 31, 2009

Project Review - Frugal Bedroom Makeover

I'm on a roll folks! I realize this is my 4th (yes 4th!) post of the day, but all of my house work is done, my sweet baby is napping, and I have so many ideas and projects I've been wanting to share that I'm just going to keep on going until duty calls me elsewhere! 


This is the only "before" picture of her room I could find!  It was taken last May when we first moved in.  As you can see, the room is empty and bare!


My goal was to decorate her room on a budget of $300.  This INCLUDED having to buy the furniture, bedding, and accessories.  ( I know *GASP GASP* but it CAN be done!) ;) 

I had originally found a green and white floral sham and quilt that I was going to use in the room, but ended up returning it to the store when my mother-in-law gave me a roll (about 4 yards worth) of pink and white stripped fabric that she had left over from years ago when my sister-in-law was a little girl.  It is sweet, soft, and feminine and least of all...free! ;)

We found a white bedspread at TJ Maxx for $20.  I love using white.  It is so versatile and neutral and makes it super easy to change the look later down the road.  Using the pink and white stripe fabric, I made her a bedskirt and sham for the bed.  I also made a cute little turtle throw pillow from scrap fabric from the sewing room. 

 The headboard was made using this tutorial I found on the BHG website.  I plan on having her monogram added to the top, but haven't done so yet.   The total cost for the headboard supplies was around $30.  

Remember this tutorial that I shared earlier this month on how to turn your mini blinds into functional shades? Well I tried it out in Anna Cate's room and guess what?!? It IS easy to do, they DO work fabulously, and it turned out to be a SUPER INEXPENSIVE solution for the time being!  On that project we spent a whopping $0 because the blinds were already up in her room and the fabric was free.

I recovered an existing lampshade that we already had in a pink and white polka dot fabric and her little rug we already had from the nursery in our old house.  The little patch work quilt at the foot of her bed was something else I kept from her nursery.  

The room still has a ways to go until it is finished.  Now its time to focus on all of the fun little details.  I need to decide on a paint color for the walls.  I also have some fun ideas (thanks to the new Pottery Barn Kids catalog) for projects to add some accessories and artwork, but it is starting to all come together now that the basics have been taken care of!    


Recovering a Lampshade Tutorial


This is a project I've been meaning to share for awhile now, but haven't had the time to sit down and write up the tutorial.  I recovered my first lamp shade two years ago while decorating my daughter's nursery.  I found a great deal on a floor lamp at TJ Maxx, but the fabric on the shade did not match the decor in the nursery.  Out of necessity, I learned how EASY it is to customize a shade that will look like you bought it from a pricey designer store! 

I was in one of my favorite furniture stores last year with my mom and about fell on the floor when I saw a lampshade for sale for $150 (!!!!) that was covered in some Amy Butler fabric I had sitting in my sewing room!   I'm sorry for whoever bought that lamp!  You can create the exact same thing for under $20 (fabric included) if you know where to look for your shade. 

I've found the best places to find them cheap are at thrift stores like Goodwill or His House.  People toss out old lamp shades all of the time and you can find some really interesting  shapes that look like they've come straight from a designer magazine when recovered with the right fabric!  Ask around and see if any of your family or friends have extras sitting in their attic they no longer need or want.  If all else fails, Target sells a basic white square shade for around $6 that can clip onto any lamp base.


First lampshade I recovered for Anna Cate's nursery


This one was given to me by my friend's mom who bought a lamp from TJMaxx but didn't like the original fabric on the shade.  I love the unique shape of this one!


Let's Get Started!

 Materials Needed:
-Lampshade 
-Fabric of your Choice 
-No Sew Fabric Glue
-Heat N Bond Hem Tape
-Iron
-Scissors
-Clothespins or Paper clips
-Newspaper


Step 1:  Using a sheet of the newspaper, trace one of the sides of the shade to create a pattern.  Depending on how many sides your shade has (most have 4 or 6), use this paper pattern to cut out the correct number you will need from your fabric.

Now measure the length (top to bottom of shade) of one of the sides.  Cut appropriate number of strips you will need to cover the edges of your lamp.  I usually cut my strips about 1 1/4 inches wide, but you can make them wider if you so desire. 

You will also need a strip of fabric for the top and bottom circumference of the shade. 


Step 2:  Take each strip of fabric and lay it out flat.  Now cut a piece of the Heat N Bond Hem tape that is the same length as your strip of fabric.  Lay the hem tape down the center of the strip and iron in both sides so that they meet.  As you iron, the hem tape will glue the fabric together to form a finished edging for the lamp.  Repeat this step until all of your strips have been ironed together. 


Step 3:  Now take your fabric glue and apply around all 4 edges of one of the sides of the lamp.  Carefully place one of your pre-cut fabric pieces over the face of the shade and smooth to make sure there are no wrinkles.   Repeat for all sides of the lamp.  (*Please note that I do not spread glue over the entire side of the shade.  Just glueing the edges will hold the fabric secure, making it easy to take apart if you ever wish to recover the shade in the future).


Step 4:  Now take the fabric strips you just ironed and glue them to each corner of the shade.  This strip of fabric should cover over the seams where your fabric is glued to give it a finished edge.  


Step 5:  Almost finished!  All you have to do now is glue the strips of fabric around the top and bottom of the lamp to completely finish off all of the raw edges.  I usually will fasten paper clips to the edges while the glue dries to ensure that it is securely fastened to the shade. 


Step 6: Now enjoy using your new lampshade! :) 

Free Pattern Roundup

In my search for ideas to make some cute spring clothes for Anna Cate this year, I've come across some fun and easy tutorials that I thought I'd share in case anybody else wanted to put them to good use!

Project Time:  About an Hour
Total Cost:  Under $10
 (could be much less depending on your fabric selection!)


Project Time:  20 minutes
Total Cost:  Less than $3.00
(I was in a hurry when I made this pink belt because I made it out of the necessity to hold her little pants up!  I just used fabric I already had on hand from the dolls; however,  if you had the time, you could make the cutest patchwork belt for children or adults using this pattern!  Think "Vineyard Vines" catalog) 


Project Time:  Around 30 minutes
Total Cost:  Under $5.00 
(Again, it all depends on how much you want to spend on your fabric.  I found this in a remnant bin at Hobby Lobby for $1.00)


(Photo courtesy of Jump Up and Down's blog) 
I have not tried this project yet, but it looks simple enough and oh so cute!


(Photo Courtesy of Grand Revival's Design Blog)
Another project that I'm itching to try...though she may be a bit young this year to wear this style skirt.


(Photo Courtesy of V and Co's Blog)
I know, I know...another skirt tutorial! But how can you resist when they are so cute and easy!


Ok, this pattern isn't free.  Sorry! :(

I've looked and looked online for a pattern for Baby Maryjane's but haven't been able to find one.  I made these shoes from a pattern I purchased from an esty shop, Precious Patterns, for $3.00.  However, they only took about 30 minutes to make and the pattern is really easy to follow!  (they look way harder to make than they actually are)  I've already made several pair for baby shower gifts.  Because I've been so pleased with the pattern, I thought I'd pass along the info!

Sweet Bunny Dress

I had to take a break the other night from smocking Anna Cate's Easter dress to work on a quick, fun Easter project.  I'd much rather work on a little project that can be completed in an hour instead of one that takes night after night of my attention!  

Using the Simplicity A line dress pattern (best $3.50 I've spent at Wal-Mart!) I fashioned this little bunny dress for her to wear around for spring.  Instead of taking the time to add the buttons and button holes, I just made the shoulder straps a bit longer so that they can tie.  Easy fast fix that looks adorable!  She can wear this style dress with a little white top or later, when the weather warms up, by itself as a sundress. It turned out so cute and was so easy that I'm already looking for more fabric to sew up some other sundresses for her to wear this summer.   

 
It's a good thing my grandmother doesn't read this blog because she'd have me skinned alive if she saw Anna Cate outside barefooted before May 1st!  Funny that has always been one of her strict rules. :)